
Customer guide
Complete customer guide
From choosing your first product to checking the design and tracking your order.
Download the Slovak guide as PDFNo chapter matches your search.
What to prepare before you begin
- a computer or tablet with a stable internet connection;
- an up-to-date Chrome, Edge, Safari or Firefox browser;
- original photographs in the highest available resolution;
- an email address you can access;
- a delivery address and the details required for payment;
- enough time to review every page carefully.
Photographs
Do not use screenshots or photographs repeatedly downloaded from social media.
Customer account
Your account stores your projects, orders and preferences.
- Sign in with the correct email address.
- Check your name, telephone number, language and addresses in your profile.
- Use a password that you do not use for other services.
- Never send your password or payment details to support.
- If you order as a guest, check your email address carefully.
Why your email matters
Order confirmations, status changes and any questions from the shop will be sent to this address.
Catalogue and product selection
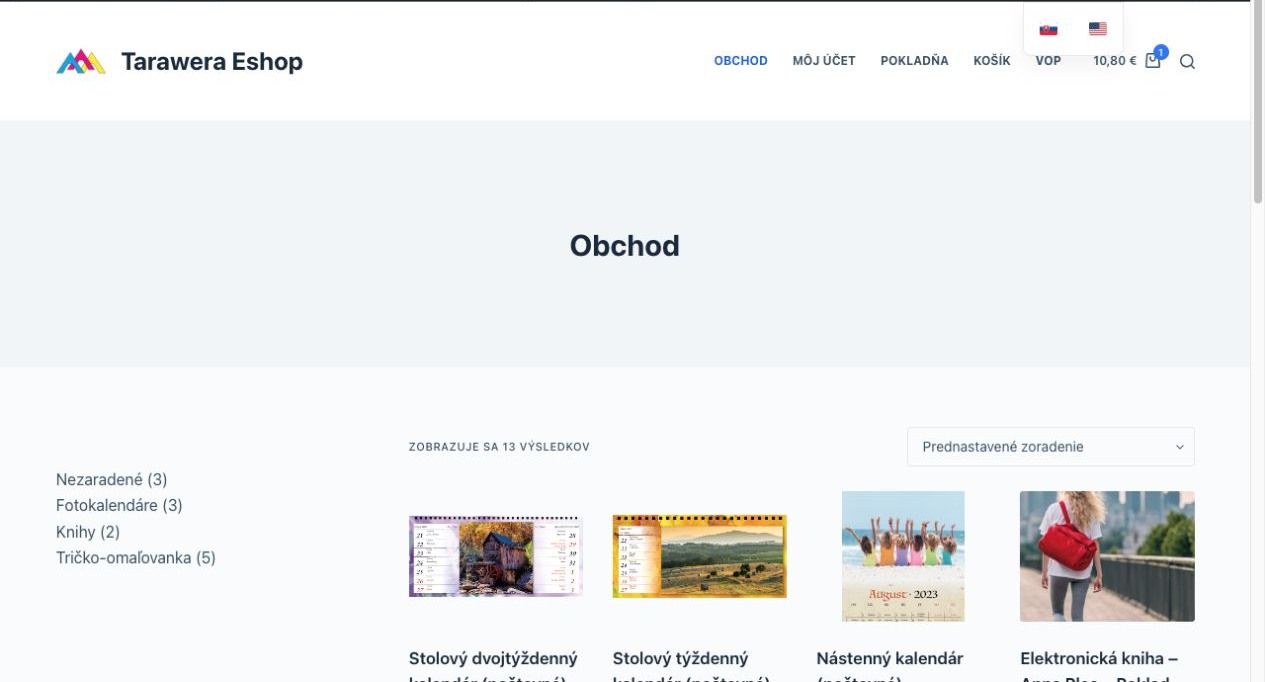
First choose the correct product type in the shop.
- Use the product categories and sorting options.
- For a personalised product, click Open Editor.
- For a product with variants, open its detail page first.
- Check the product name and type before opening the editor.
Important
A photo book, wall calendar and desk calendar are separate product types and require separate projects.
Choosing the correct product type
Before you begin, answer these questions:
- Should the product hang on a wall, stand on a desk or be browsed like a book?
- Which format and orientation suit your photographs?
- How many pages or months do you need?
- Should the product include name days, holidays or personal dates?
- How many copies do you plan to order?
Decide in advance
Changing to a completely different product type usually requires a new project.
Format and orientation
| Option | Effect on the design |
|---|---|
| Portrait | Suitable for portraits and vertical compositions. |
| Landscape | Suitable for scenery, groups and wide shots. |
| Square | Usually requires more cropping of standard photographs. |
The aspect ratio determines how much of a photograph remains visible.
Before uploading
If most of your photographs are wide, consider a landscape format.
Paper, page count and price
| Parameter | Meaning |
|---|---|
| Paper | The material and weight of the printed product. |
| Page count | The extent of the project; it is fixed for some products. |
| Price | The current price for the selected product and options. |
| Quantity | The number of identical copies is set in the cart. |
Before you begin, check the summary in the editor top bar.
Creating and naming a project
- Open the selected product in the editor.
- Enter a clear project name.
- Check the format, page count and paper.
- Save the project before making major changes.
Good names
For example, Family Calendar 2027 or Tatras Photo Book 2026.
Opening an existing project
Your saved projects are available in your customer account.
- Open My Account and the Projects section.
- Select the project by its name and preview.
- If the PDF is being prepared, wait for it to finish.
- Before continuing, make sure this is the correct version.
- The project will open in the editor.
Multiple browser tabs
Do not edit the same project in two browser tabs at the same time.
Finding your way around the Online Editor
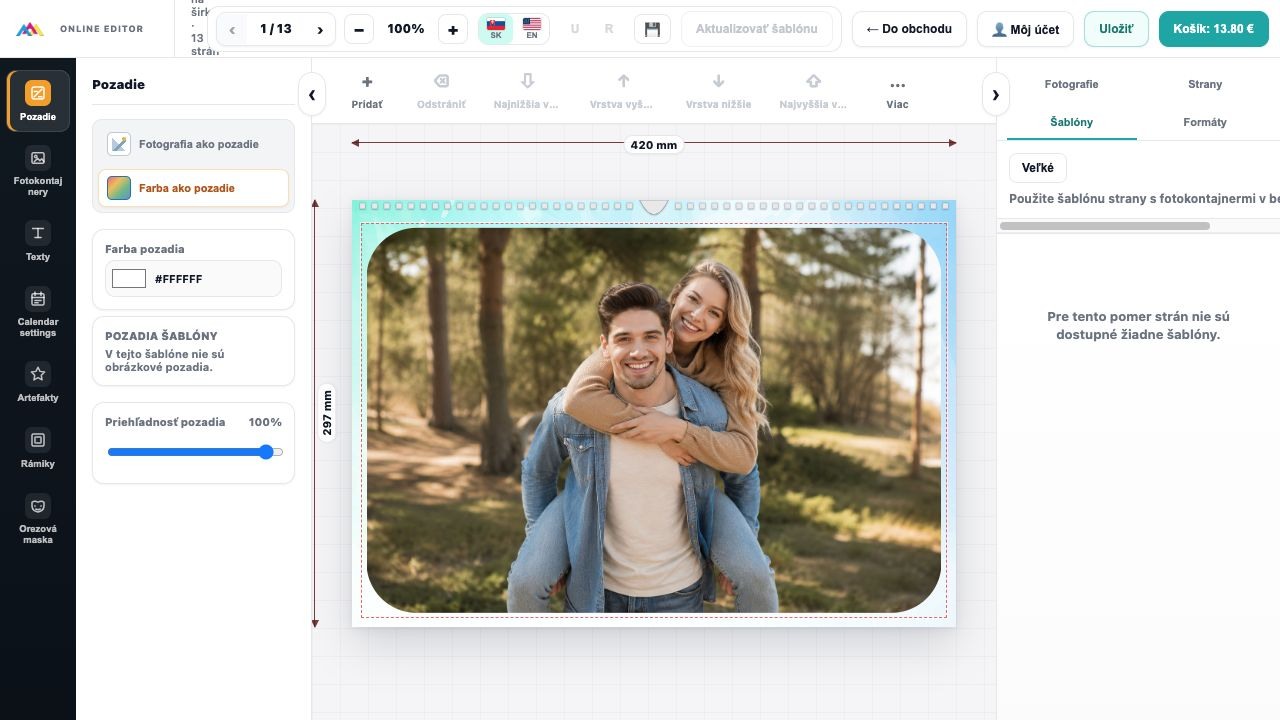
The main screen combines the canvas, tools and library.
- Top bar: project name, pages, zoom, language, save and cart.
- Left side: available element sections.
- Centre: the current product page.
- Bottom or right panel: photographs, pages, templates and formats.
Panels and workspace
| Area | Use |
|---|---|
| Background | A photograph or colour used as the page background. |
| Photo containers | Photographs placed in prepared frames. |
| Texts | Personalised text and the available font and colour options. |
| Calendar settings | Shared calendar settings. |
| Bottom panel | Photographs, pages, templates and formats. |
Tip
You can collapse panels to create more room on the screen.
Moving between pages and using zoom
- Use the arrows to move to the previous or next page.
- The counter shows the current page and the total page count.
- Use Zoom + to check details.
- Use Zoom - to review the complete composition.
- Check the photograph crop before moving to the next page.
Final review
View every page both in detail and as a whole.
Change history: Undo and Redo
- Undo reverses the most recent change.
- Redo restores the most recently undone change.
- After a major change, verify that the result is what you expected.
- History does not replace saving the project regularly.
- The complete history may not be available after reopening a project.
Safe procedure
If you are unsure about changing a template or format, save the project first.
Uploading photographs
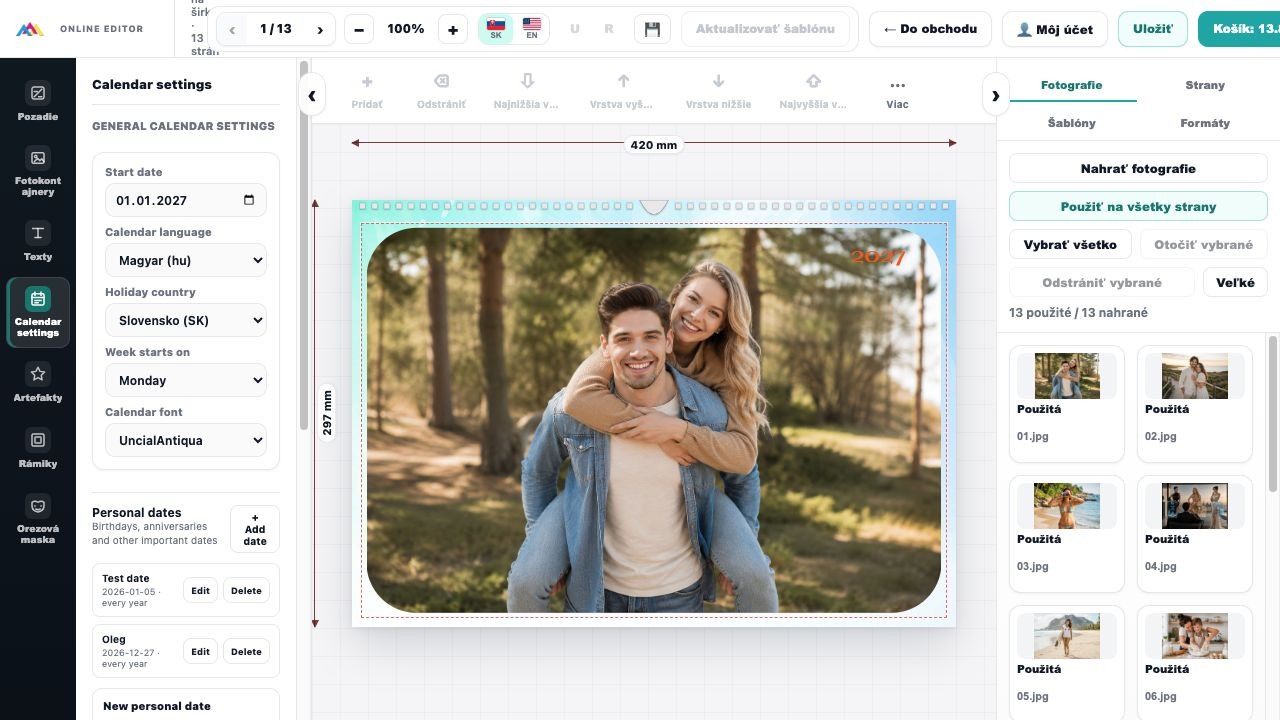
- Open the Photographs tab.
- Click Upload photographs.
- Select files from your device.
- Wait for each upload to finish.
- Make sure the previews appear.
If an upload fails
Check your internet connection and try uploading fewer files at a time.
Photograph library
- The Used label identifies a photograph that has been placed in the project.
- The counter helps you compare the number of used and uploaded photographs.
- The same photograph may be used more than once when the design requires it.
- For a large project, prepare clear and logical filenames.
- Before deleting a photograph, check whether the project still uses it.
Selecting photographs
Avoid using several almost identical photographs unless this is intentional.
Automatic photograph layout
If the template supports automatic placement, you can use it to fill the prepared containers quickly.
- Upload all selected photographs.
- Run the available automatic layout function.
- Review every page.
- Correct unsuitable crops.
- Replace duplicate or weak images.
Automation cannot understand your intention
The system cannot know which face or object is most important to you.
Placing a photograph in a container
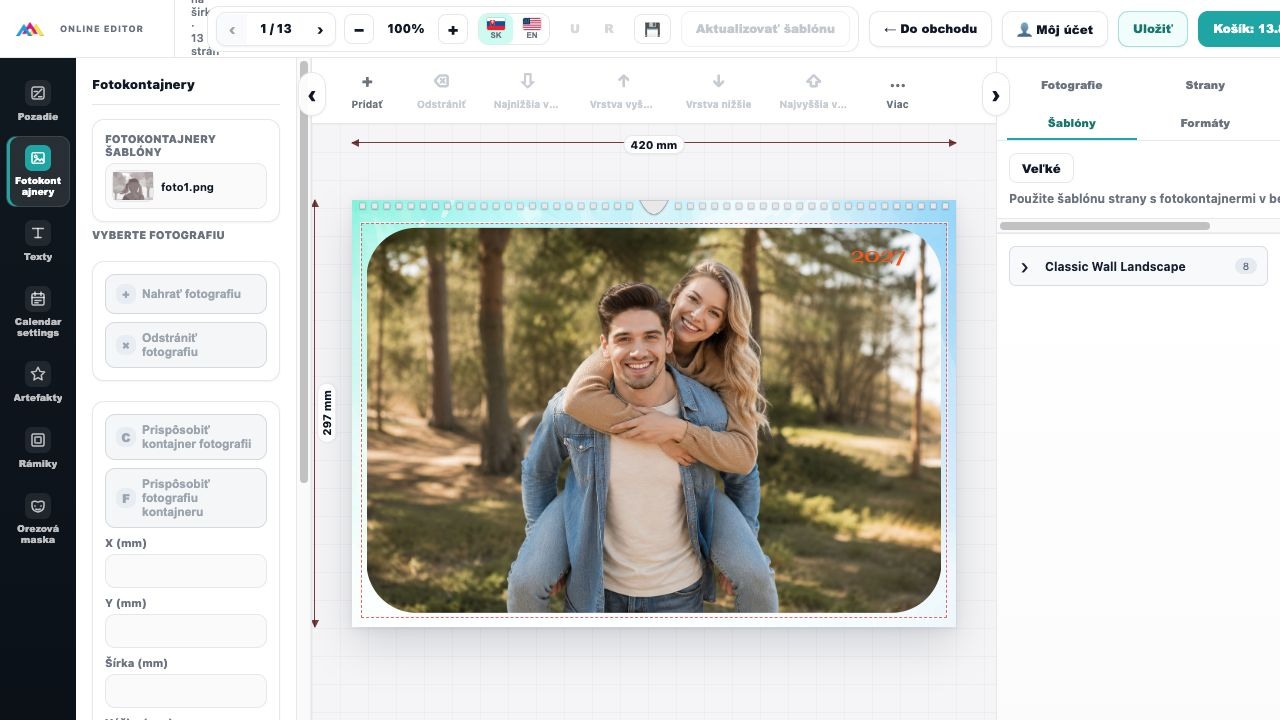
- Select the required page.
- Click a photograph in the library or drag it into a container.
- Check what is visible in the crop.
- Adjust the zoom.
- Move the photograph inside the container.
Important
The photo container is protected, but the photograph can still be moved and zoomed inside it.
Fitting photographs and containers
| Function | Result |
|---|---|
| Fit container to photograph | The frame follows the photograph aspect ratio when the design allows it. |
| Fit photograph to container | The photograph fills the existing frame and may be cropped. |
| Zoom | Changes the photograph size inside the frame. |
| Position | Determines which part of the photograph remains visible. |
| After automatic filling | Always check heads, faces, hands and important objects. |
The basics of a correct crop
The editor cannot determine which part of a photograph should remain visible.
CORRECT
The head and face are complete. There is suitable space around the subject.
- The main subject must be complete or deliberately cropped.
- Leave some space around heads and faces.
- Check all four edges of the container.
- Do not crop joints, fingers or text unintentionally.
Human review
Automated quality checks cannot replace this visual judgement.
Incorrect cropping and how to fix it
INCORRECT
Zooming has cut off the top of the head. The crop must be corrected.
- Reduce the photograph zoom.
- Move the photograph until the complete head is visible.
- If the crop cannot be corrected, choose another photograph.
- Check sharpness and the quality warning again.
Common mistake
A photograph may look fine as a thumbnail while part of the head is outside the container in the detailed view.
Portraits and faces
- Keep the eyes and face in a natural part of the composition.
- Do not place the top of the head directly against an edge unless this is intentional.
- Check the hair, ears, chin and shoulders.
- When zooming, also check the sharpness of the eyes.
- If the face is close to the edge of the original photograph, consider another image.
Portraits in a large format
Blur and compression become more visible as the print size increases.
Group photographs
GROUP PHOTOGRAPH
All faces are complete. There is enough room around the group for cropping.
- Check the people at both edges of the group.
- Do not crop the heads of people in the back row.
- Leave space above and beside the group.
- Review the entire group after changing the aspect ratio.
- If everyone does not fit, use a wider container or another photograph.
Scenery, buildings and objects
- Check the horizon and the vertical lines of buildings.
- Do not cut off the top of a tower, a roof or an important sign.
- Any text in a photograph must remain fully readable.
- Consider leaving space in the direction in which the main subject looks or moves.
- A wide container is more suitable for a panorama.
Composition
Do not force an unsuitable shape with extreme cropping; a different template is often better.
Zoom and print quality
Small print - Medium print - Large print
The larger the printed area or the stronger the zoom, the more pixels the photograph needs.
- Zooming uses a smaller portion of the original photograph.
- A smaller portion contains fewer pixels for printing.
- A large container requires more pixels than a small one.
- A quality warning may appear after enlarging or zooming.
Composition first, quality check second
Set the final crop before evaluating the resolution warning.
Rotation, flipping and corners
- Use rotation only for an incorrect orientation or an intentional creative effect.
- Horizontal flipping may mirror text, logos or asymmetric details.
- Rounded corners change only the visible container shape.
- Check the complete crop after every change.
- If a photograph contains text, always read it after flipping.
Page background
| Option | Use |
|---|---|
| Photograph as background | The photograph fills the page and may be cropped. |
| Colour as background | Select a colour and the available opacity. |
| Template background | Use a prepared image supplied by the template. |
Photographic background
Check the crop and quality even when a photograph is used as a background.
Adding and editing text
The Texts section displays previews of the fonts allowed by the current template. Each preview uses the font that will be applied to the new text object.
| Insertion method | Procedure |
|---|---|
| Double-click | Double-click the preview of the required font. The text is added to the centre of the current page. |
| Drag and drop | Drag the font preview directly to the required position on the canvas. |
- Open the Texts section.
- Choose a font from its preview.
- Double-click to add text in the centre or drag it to a specific position.
- Select the inserted text and replace the initial word Sample with your own content.
- Use the available controls to change the font variant, size, colour, alignment and other properties.
- Check the spelling and make sure the complete text is visible.
Fonts are defined by the template
Only fonts allowed by the template author are shown. If no preview appears, that template does not allow separate text objects to be added.
The customer is responsible for the content
The editor does not automatically correct names, dates, telephone numbers or spelling.
Checking text before printing
- Read every text at a sufficient zoom level.
- Check accents, capital letters and special characters.
- Verify dates, years, names and contact details.
- For a gift, ask someone to confirm the dedication.
- If the text is long, make sure it is fully visible and readable.
Automatic protection
Text objects cannot leave the safe area and other objects cannot cover them. The customer must still check the accuracy of the content.
Protected design elements
The editor automatically protects important parts of the template.
- Photo containers remain inside the permitted safe area.
- Texts remain inside the safe area.
- Layer controls prevent another object from covering text.
- The calendar grid always remains on top and cannot be covered.
- You do not need to check these protections manually on every page.
What to focus on
Check the text content, photograph crops, quality, calendar year and personal dates.
Managing and checking pages
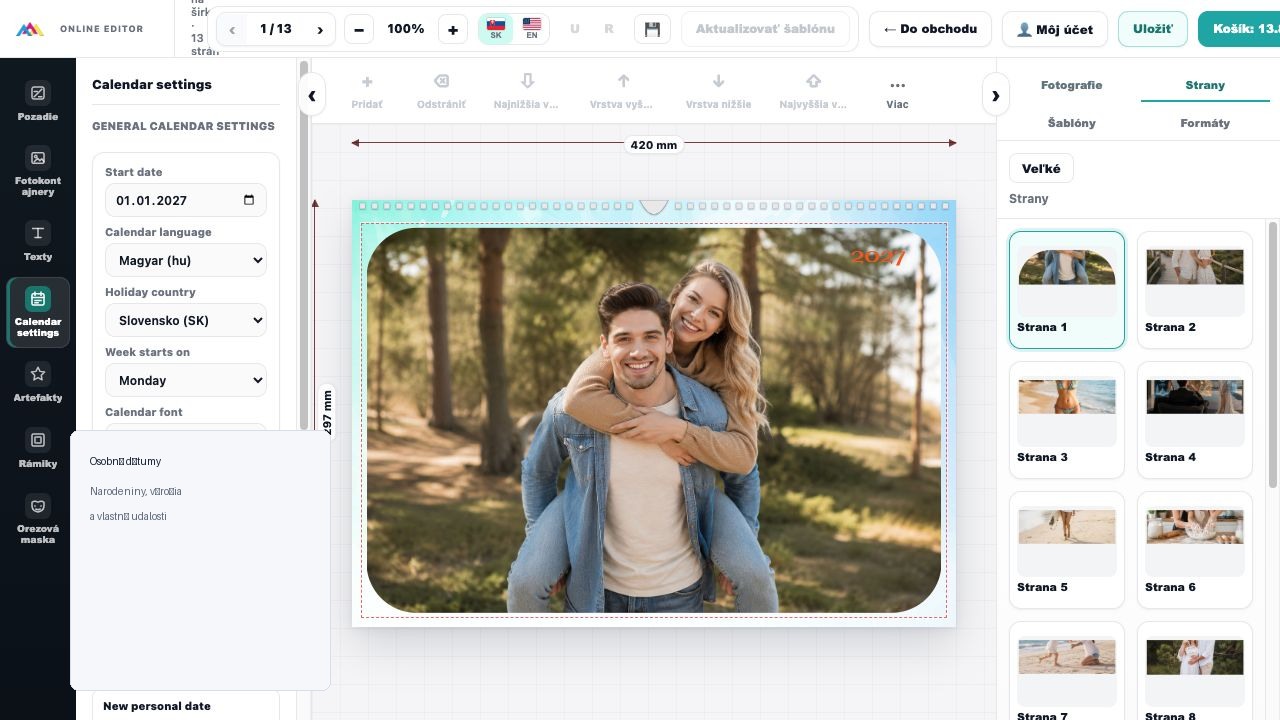
- Click a thumbnail to open a specific page.
- Review every page without skipping any.
- Check the order and orientation.
- The cover or title page may use a different layout.
- The page count may be fixed by the product.
Page templates
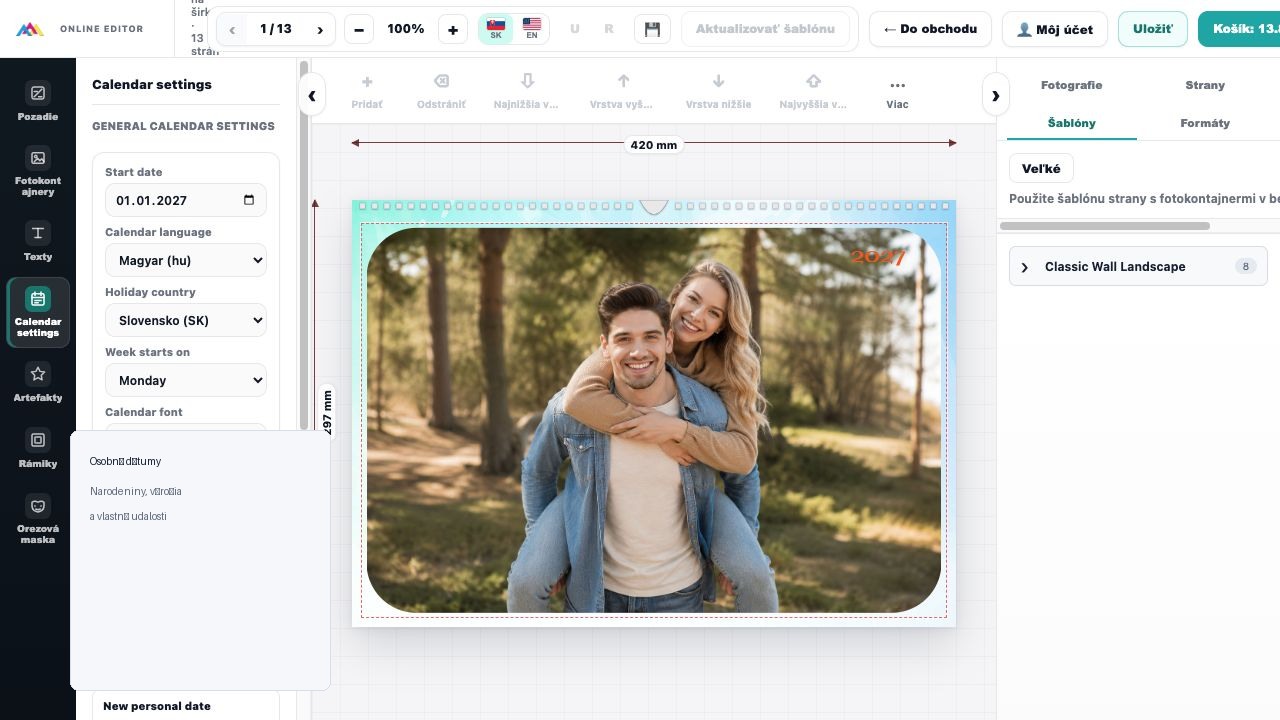
- Select a page.
- Open the Templates tab.
- Click the required layout.
- Check the transferred photographs.
- Correct every changed crop.
After changing a template
Automatic transfer of photographs does not replace checking the composition.
Changing the project format
A new format may use a different aspect ratio.
- The editor warns that photographs may look different.
- Keep photographs leaves them on the canvas.
- Remove from canvas removes them from the pages but not from the library.
- Review all pages after the change.
- Adjust the crops again and run Design Check.
Before changing
Save the project first.
Basic calendar settings
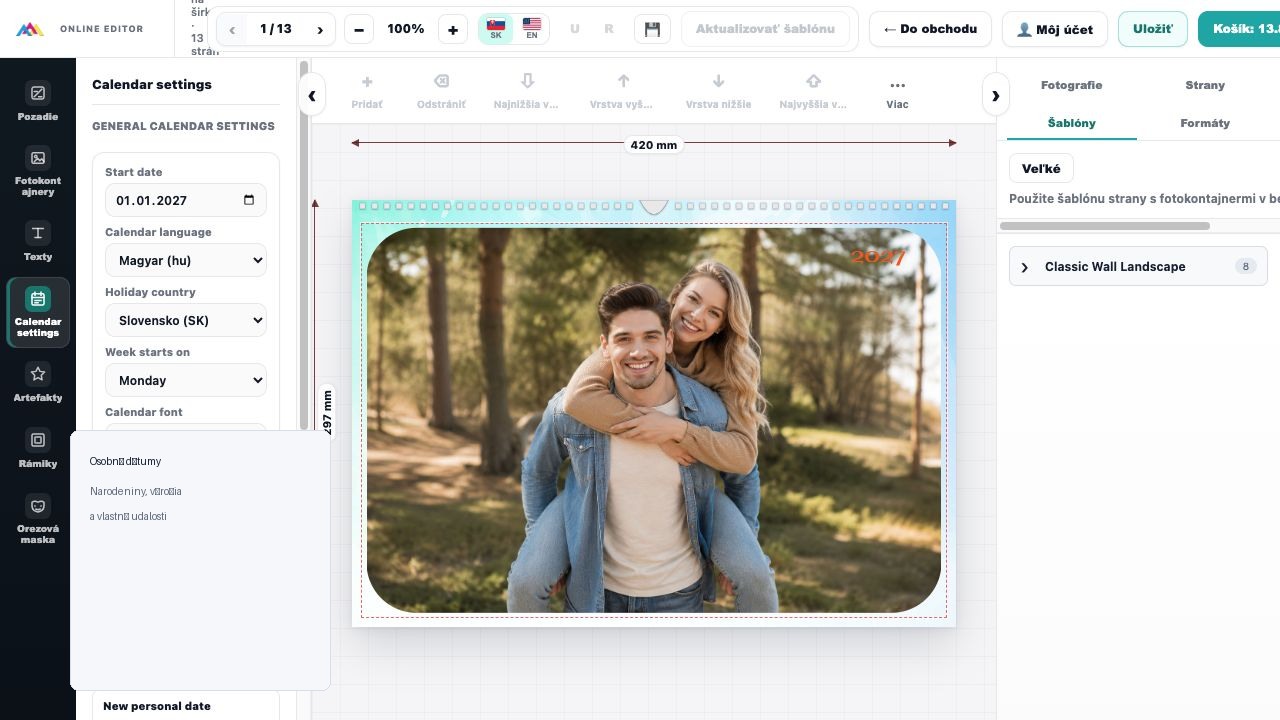
- Start date sets the beginning or year of the calendar.
- Calendar language sets the language of months, weekdays and names.
- Holiday country selects the country whose holidays are used.
- Week starts on selects Monday or Sunday.
- Calendar font offers the fonts permitted for the calendar.
Language and holidays
These are separate settings; check both.
Personal dates in a calendar
- Open Personal dates.
- Click + Add date.
- Enter the event name and date.
- Enable Repeat every year if the event should recur.
- Select an available highlight and colour.
- Save it and check the date in the relevant month.
Privacy
Do not enter sensitive information that you do not want printed.
Names, holidays and a personal event
| Option | Result |
|---|---|
| Keep | Standard names or the holiday remain together with the personal event. |
| Hide | The standard content for that day is not displayed. |
| Replace | The personal text replaces the standard content when the option is available. |
| Check the result | After saving, open the relevant month and verify that the day looks as expected. |
Highlighting a personal date
- Select an available symbol or shape.
- Choose a filled or outline style when available.
- Select a colour that remains visible against the background.
- Do not use too many different styles without a reason.
- Make sure the highlight belongs to the correct day.
Checking every month
- Verify the calendar year.
- Review every month from January to December.
- Check month names and weekdays.
- Verify personal dates and recurrence.
- Check the highlight text and colour.
- Finally, run Design Check.
Calendar grid
It is protected and always remains on top. The customer checks the accuracy of the information.
What happens during Design Check
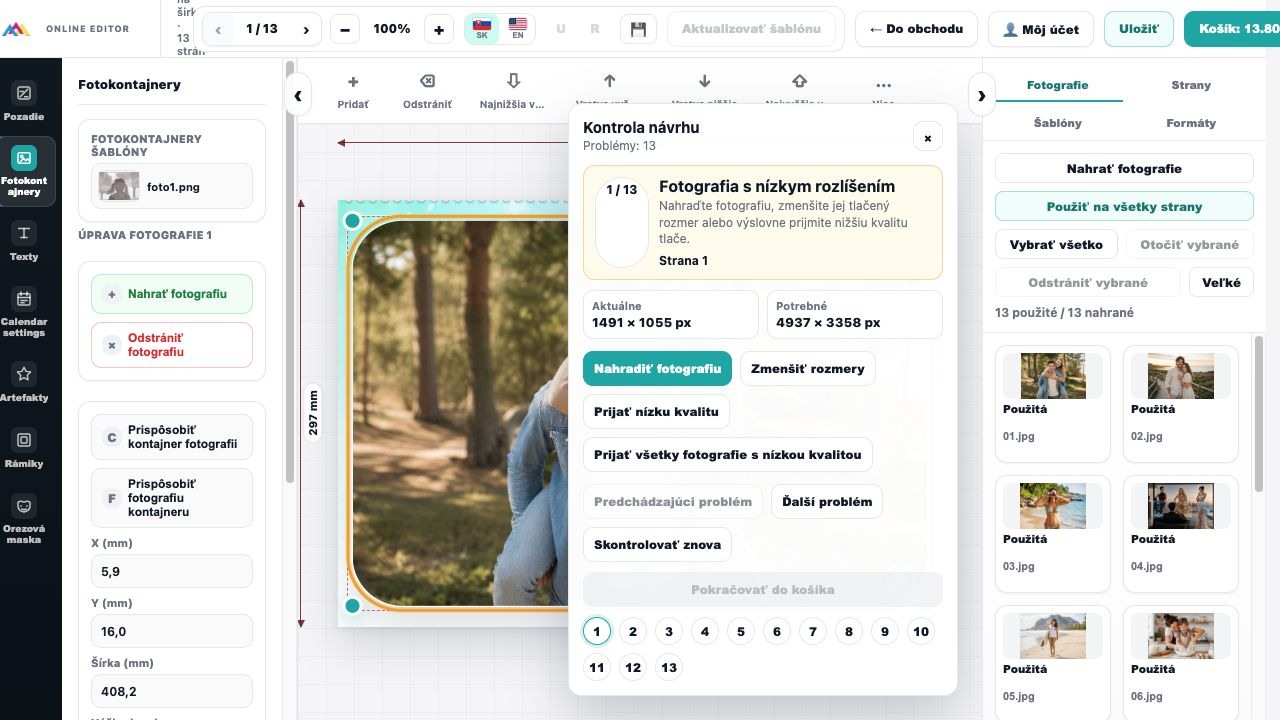
When you proceed to the cart, the editor checks all pages.
- Issues are grouped by page and object.
- The editor opens the relevant page and focuses on the issue.
- You can move to the previous or next issue.
- After correcting it, select Check again.
- You can continue after correcting or knowingly accepting all blocking issues.
What low resolution means
- The photograph has fewer pixels than its printed size requires.
- The result may be blurred or pixelated.
- The risk increases with a large format and strong zoom.
- The on-screen preview may not reveal the problem.
- The best solution is an original file with higher quality.
This is not a monitor problem
Printing requires more detail than ordinary on-screen display.
Current and required dimensions
| Value | Meaning |
|---|---|
| Current | The available photograph dimensions in pixels. |
| Required | The estimated pixels required for the current printed size and zoom. |
If the current width or height is below the requirement, the editor displays a warning.
After changing the crop
Run the check again; the required dimensions may have changed.
How to resolve low quality
| Option | When to use it |
|---|---|
| Replace photograph | Use this when you have a higher-quality original or another image. |
| Reduce dimensions | Use this when the photograph is an independent object and can be printed smaller. |
| Reduce zoom | Use this when only a small portion of the source photograph is being used. |
| Accept low quality | Use this only when no better source exists and you knowingly accept the risk. |
Recommended order
Try the original first, then reduce the size or zoom; accept the warning only as a last resort.
Accepting low quality
The Accept low quality button acknowledges the warning but does not repair the photograph.
- The file resolution does not increase.
- Blur or pixelation may remain visible in print.
- Acceptance applies to the specific object and its current settings.
- A new check may be required after changing the photograph or crop.
- Accept all should be used only after reviewing every item.
An informed decision
Continue only when you understand the risk and have no better photograph.
Empty photo container
- Add photograph - fills the missing image.
- Delete container - removes an unnecessary empty object when permitted.
- Accept empty container - intentionally leaves it empty.
- Accept all empty containers - confirms all currently empty positions.
- Run the check again after making a change.
Bulk acceptance
Use it only after visually checking every empty container.
Checking again and continuing
- Correct or accept the current issue.
- Move to the next issue.
- When finished, click Check again.
- If a new warning appears, resolve it.
- When no blocking issues remain, click Continue to cart.
Visual review is still required
Design Check cannot judge whether a face is aesthetically cropped or whether personal text is correct.
Saving the project and its final version
- Click Save.
- Wait for saving to finish.
- Check the project name.
- Run Design Check.
- Only then proceed to the cart.
Project and cart
The cart must contain the latest saved version. If you make another change, save the project again and repeat the move to the cart.
Projects in your customer account
- Preview opens the prepared preview or PDF.
- Edit opens the project in the editor again.
- Copy creates an independent version.
- Delete removes an unnecessary project after confirmation.
- Actions may be temporarily unavailable while the PDF is being prepared.
Project copy
Use it for a similar gift or the next calendar year without changing the original.
Cart, quantity and coupons
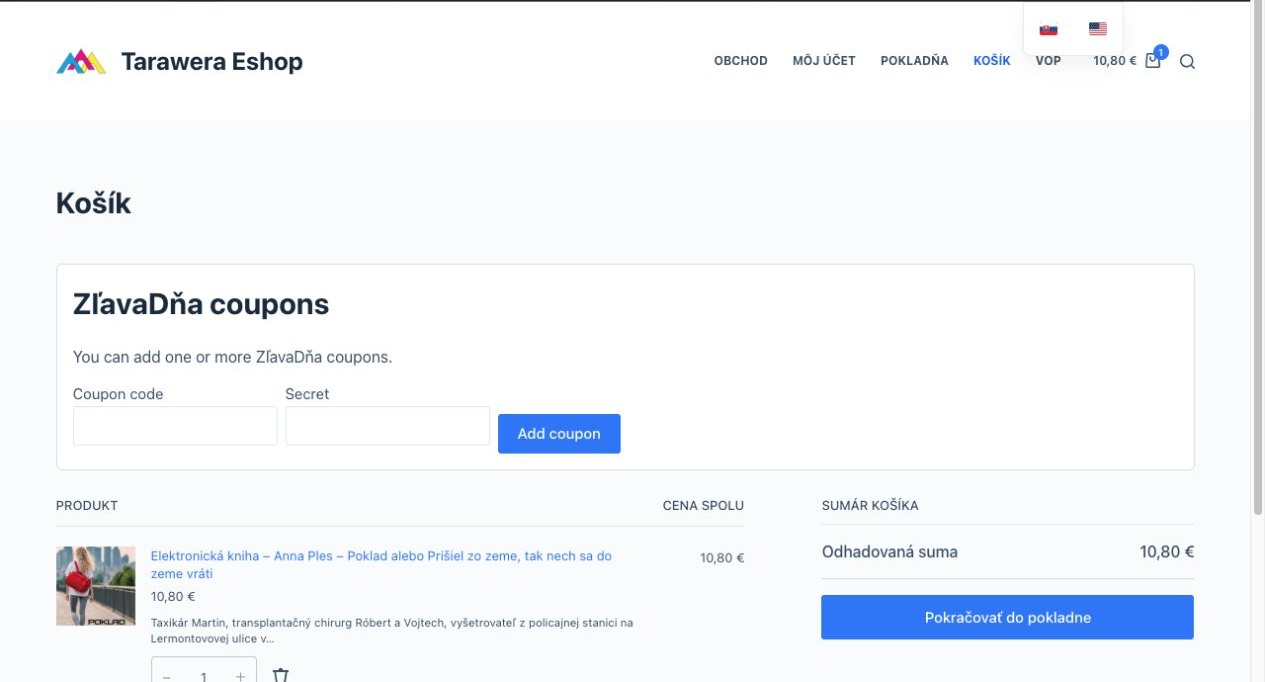
- Check the project name, price and quantity.
- Plus and minus change the number of copies.
- Remove any unnecessary item.
- For a ZľavaDňa coupon, enter the Coupon code and Secret.
- After applying a coupon, verify the discount in the summary.
If a coupon does not work
Check spaces, uppercase and lowercase letters, validity and promotion conditions.
Checkout and contact details
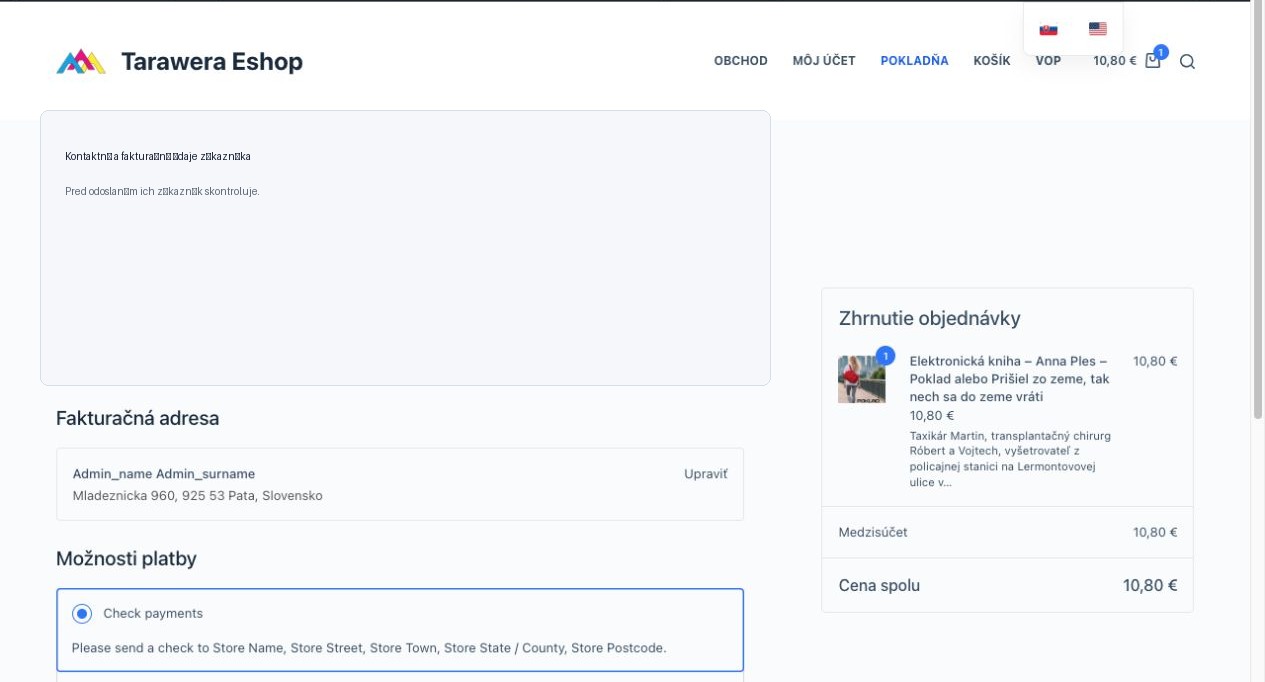
- Use a valid email address.
- Check your name and telephone number.
- Verify the billing address.
- If the delivery address is different, enter it separately.
- Compare the contents and price in the order summary.
Delivery, Packeta and payment
| Area | What to check |
|---|---|
| Delivery | Check the selected method and its price. |
| Packeta | Check the name, address, country and type of collection point or Z-BOX. |
| Payment | Check the payment method and any instructions. |
| Order note | Enter only supplementary information, never payment details. |
| Terms and conditions | Confirm acceptance of the terms and privacy policy. |
Before submitting
Check the final price, delivery, address and every item once more.
After submitting the order
- A confirmation and order number are displayed.
- The confirmation is also sent by email.
- Track the status in My Account - Orders.
- In print means that the order is in production.
- Cancellation is available only while the current status permits it.
- An order cannot be cancelled after printing has begun or the order is completed.
If you discover an error
Contact the shop immediately and provide the order number. Editing the saved project does not change an order that has already been submitted.
Troubleshooting and final checklist
| Problem | Solution |
|---|---|
| Photograph will not upload | Check the internet connection and try fewer files at a time. |
| Photograph is blurred | Use the original file or a smaller printed size. |
| An important part is cropped | Reduce the zoom or reposition the photograph inside the container. |
| Cannot continue | Resolve every unaccepted Design Check item. |
| Coupon does not work | Check the code, Secret, validity and conditions. |
| PDF is being prepared | Wait for it to finish and refresh the page later. |
Before clicking Place order
- correct product, format and paper;
- every page checked;
- faces and important details cropped correctly;
- texts, names and dates correct;
- calendar year and personal events correct;
- Design Check resolved;
- project saved;
- quantity, coupon, address, delivery and payment correct.
Need help?
Provide the account email, project name, order number, a short description and a screenshot. Never send your password or payment-card details.
We hope you enjoy creating your product and love the result.